
Chapped, dry lips can be uncomfortable and unflattering, but store-bought lip scrubs often cost $10 or more for a tiny jar. This **DIY lip scrub recipe** uses inexpensive pantry staples to gently exfoliate dead skin, hydrate your pout, and leave lips baby-soft—all for under $1 per batch. Not only does it save money, but you control the ingredients, avoiding synthetic fillers and preservatives found in commercial products.
Lip scrubs work by combining a **gentle exfoliant** (like sugar) with a **moisturizing base** (like oils or honey), promoting smoother texture and better lipstick application. Regular use, 2-3 times weekly, reveals healthier lips without irritation. We’ll cover benefits, ingredients, step-by-step instructions, variations, application tips, storage advice, and FAQs to get you started.
Why Make Your Own Lip Scrub? The Cost-Saving Benefits
Commercial lip scrubs promise soft lips but come with a hefty price tag and questionable additives. A single tube might last a month but costs $8-15, totaling over $100 yearly. In contrast, this homemade version uses bulk ingredients: a bag of sugar ($2 for pounds), honey ($5 jar), and coconut oil ($6 tub)—enough for dozens of batches under $0.50 each.
- Save 90%+: Make 20+ scrubs from one shopping trip versus buying pre-made.
- Natural & Customizable: Skip parabens, dyes, and fragrances; add flavors you love.
- Multi-Use Ingredients: Sugar, honey, and oils work for body scrubs, masks, and more.
- Quick & Easy: Prep in 5 minutes, no special tools needed.
Beyond savings, DIY scrubs deliver fresher results since they’re made on-demand, reducing waste from expired products.
Lip Scrub 101: Key Ingredients Explained
Effective lip scrubs balance exfoliation and hydration. The **exfoliant** buffs away flakes, while the **base** nourishes and protects the delicate lip skin, which lacks oil glands unlike the rest of your face.
Exfoliants: Gentle Grain Choices
Sugar is the gold standard—fine granules slough dead cells without micro-tears from harsher salts. Opt for white, brown, or coconut sugar for varying textures.
- White Sugar: Fine grind for sensitive lips; dissolves quickly.
- Brown Sugar: Moist from molasses, milder exfoliation with built-in humectants.
- Coconut Sugar: Largest grains for deeper scrub; nutty flavor.
Avoid table salt on lips—too abrasive and drying.
Moisturizing Bases: Hydrate & Soothe
Choose emollients that melt into skin, locking in moisture post-exfoliation. Common options include:
| Ingredient | Benefits | Best For |
|---|---|---|
| Coconut Oil | Antibacterial, deeply hydrating, solid at room temp | All lip types; tropical scent |
| Honey | Humectant draws moisture, antibacterial, soothing | Dry/chapped lips |
| Olive or Almond Oil | Lightweight, vitamin E-rich, non-greasy | Oily skin; quick absorb |
| Shea Butter | Collagen-boosting, thick barrier repair | Very dry/winter lips |
Flavor & Boosters: Elevate Your Scrub
Add 1-2 drops essential oils or natural extras for scent, color, and therapy. Use sparingly—lips absorb quickly.
- Peppermint EO: Tingles, boosts circulation for plumper look; natural SPF.
- Lavender EO: Calms irritation, antiseptic healing.
- Cinnamon: Warms lips, plumping effect (dilute to avoid burns).
- Beet Powder: Natural pink tint.
- Vitamin E: Preservative, antioxidant protection.
Tip: Citrus oils (orange, grapefruit) increase sun sensitivity—use at night only.
Basic 3-Ingredient DIY Lip Scrub Recipe
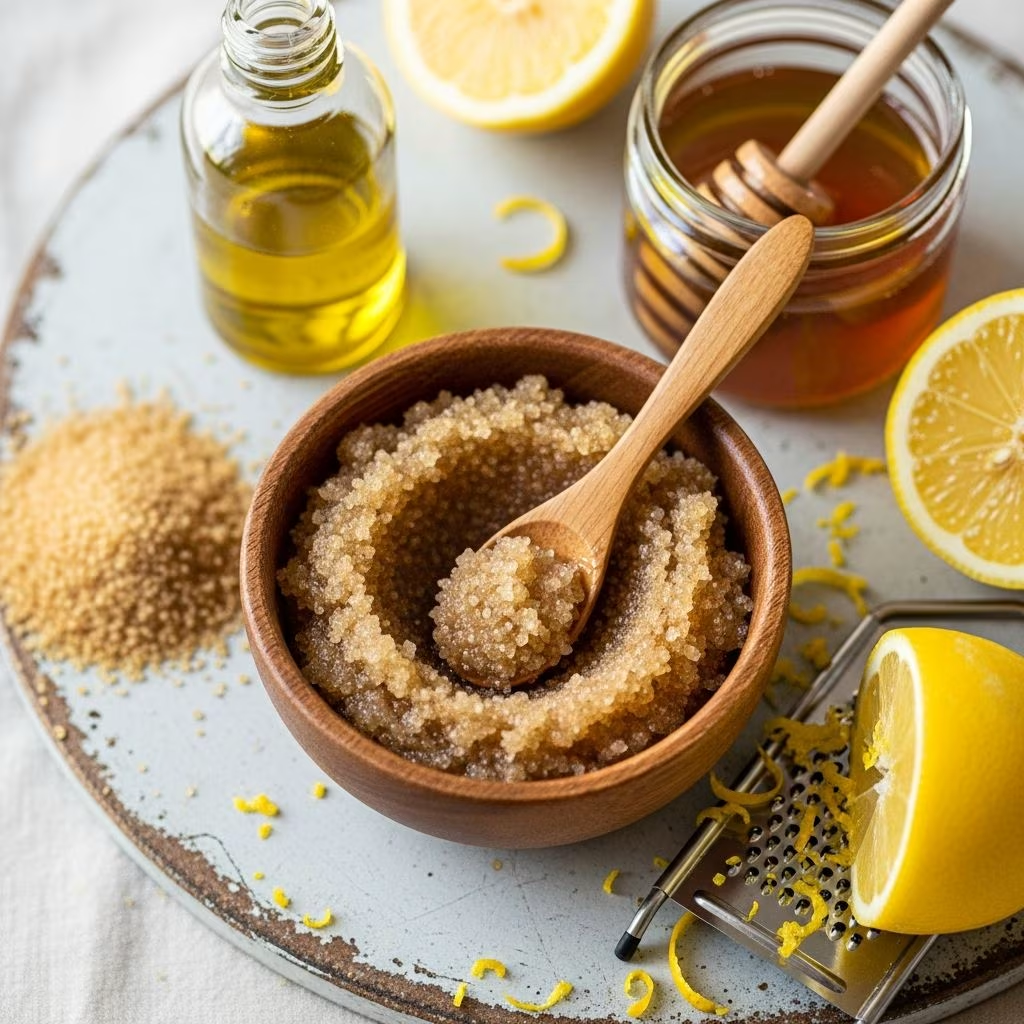
This foolproof recipe yields 4-6 uses, perfect for beginners. Scale up for gifting.
Ingredients
- 1 tbsp softened **coconut oil** (or shea butter)
- 1 tbsp **honey** (raw preferred)
- 2 tbsp **fine sugar** (cane, brown, or coconut)
- Optional: 1-2 drops essential oil, 5 drops vitamin E, ½ tsp beet powder
Step-by-Step Instructions
- Mix coconut oil and honey in a small bowl until smooth (microwave 10 sec if solid).
- Stir in optional oils/powder for flavor/color.
- Add sugar gradually; adjust for gritty (more sugar) or creamy texture.
- Scoop into airtight jar (reuse lip balm tins). Yields ~¼ cup.
Prep time: 5 minutes. Shelf life: 1-2 weeks room temp; 1 month with vitamin E (fridge for longer).
Flavor Variations: 5 Custom Lip Scrub Recipes
Tweak the base for tastes/seasons. Each uses the 1:1:2 ratio.
1. Pumpkin Spice Coffee Scrub (Fall Favorite)
Exfoliates with coffee grounds; antioxidants from pumpkin.
- ⅛ cup brown sugar + ⅛ cup used coffee grounds
- 2 tbsp pumpkin puree
- 1 tsp honey + 1 tbsp coconut oil + ¼ tsp shea + nutmeg sprinkle
2. Strawberry Vitamin C Scrub
- Mash 1 strawberry + ½ tsp coconut oil + 2 tsp raw sugar + ½ tsp honey
Vitamin C brightens, citric acid polishes.
3. Cinnamon Plumping Scrub
- 2 tbsp coconut sugar + 2 tbsp coconut oil + 1 tbsp cinnamon + 1 tbsp honey
Warming sensation enhances fullness.
4. Peppermint Refresh Scrub
- 1 tsp coconut oil + 1 tsp honey + 1½ tsp sugar + 3 drops peppermint EO
Invigorates, improves circulation.
5. Rose Petal Luxe Scrub
- 2 tbsp sugar + 1 tbsp almond oil + crushed dried rose petals + dash vanilla
Antioxidant-rich for spa-like glow.
How to Use Your DIY Lip Scrub Safely
Over-exfoliation thins lip skin—limit to 2-3x/week.
- Wet lips lightly.
- Apply pea-sized amount; massage in circles 30-60 seconds.
- Rinse or wipe with warm cloth.
- Follow with lip balm (petroleum-free like beeswax).
For best results, use at night. Patch test new ingredients on inner arm.
Storage & Shelf Life Tips
Water introduces bacteria—keep dry.
- Container: Glass/plastic jar with tight lid; sterilize with alcohol.
- Room Temp: 1-2 weeks in cool, dark spot.
- Fridge: Up to 1 month; oils may solidify (soften before use).
- Signs of Spoilage: Mold, off-smell, separation—discard.
Vitamin E or grapefruit seed extract extends life naturally.
Frequently Asked Questions (FAQs)
Is sugar safe for lip scrubs?
Yes, fine sugar is gentle and dissolves, unlike salt. It acts as a humectant too.
How often should I use a lip scrub?
2-3 times weekly max to avoid irritation. Daily for very dry lips, then taper.
Can I use this on kids?
For ages 8+; skip strong flavors like cinnamon/peppermint. Supervise application.
What if my lips sting?
Rinse immediately; dilute with more oil next time. Discontinue irritants.
DIY vs. store-bought: Which is better?
DIY is cheaper, fresher, customizable. Store-bought offers convenience/stability.
Final Tips for Kissably Soft Lips Year-Round
Pair scrubbing with hydration: drink water, use balm daily, avoid licking lips. In winter, add extra shea; summer, lightweight oils. Gift jars with ribbons for holidays—personalized savings!
This **DIY lip scrub** transforms budget ingredients into luxury care, proving soft lips don’t require splurging. Experiment safely for your perfect formula.
References
- Easy 3 Ingredient DIY Lip Scrub Recipe — Blue Heron Botanicals. Accessed 2026. https://blueheronbotanicals.com/blogs/blog/easy-3-ingredient-diy-lip-scrub-recipe
- DIY Lip Scrub to Exfoliate and Smooth Your Lips — DrAxe.com. Accessed 2026. https://draxe.com/beauty/homemade-lip-scrub/
- DIY Lip Scrubs: 14 Recipes to Try — Healthline. 2023-10-12. https://www.healthline.com/health/beauty-skin-care/diy-lip-scrubs
- Lip Scrub Benefits: 3 Benefits and How to Use it — Three Ships Beauty. Accessed 2026. https://www.threeshipsbeauty.com/blogs/news/lip-scrub-benefits
- How to Exfoliate Lips and DIY Lip Scrub — NIVEA. Accessed 2026. https://www.nivea.com.au/advice/skin/how-to-exfoliate-lips
This article is general information, not personal financial advice. Consider your own situation, or speak with a licensed adviser, before acting on it.